Tech-Today
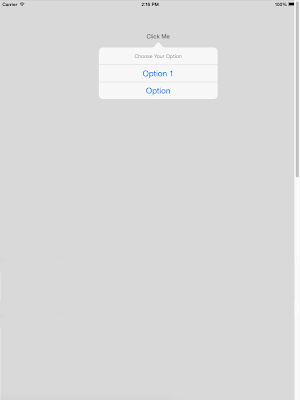
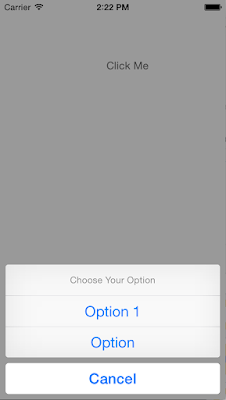
1.) First you'll need a button where you can attach your pop over when you're using iPad (in iPhone it not necessary). Then you'll have to create an outlet for the button (in my example i named it "btn_button") so we can determine the pop over location based on where the button is placed inside the viewcontroller.
2.) Inside the button's action, paste the following lines of code:
-First we declare a UIAlertController where we can put our buttons.
-Second we created the buttons (Option1, Option2, and Cancel) and then we add the buttons inside the alert controller.
-Last we use the UI_USER_INTERFACE_IDIOM to determine if the device/emulator is an ipad or an iphone and do the necessary presentation for each particular device.
-
Send Email using MFMailComposer (Template)1.) Import MessageUI import MessageUI 2.) Show Email func showMail() { let mailComposeViewController = configuredMailComposeViewController() if MFMailComposeViewController.canSendMail()...
- Simple To-do List Using Core Data In Swift
Note: The steps 1-9 are all simply about setting-up the controllers. The main "core data" begins the next step after. Here's the finish project from step-1 to step-9. 1.) First, for us to have a better view, we have to disable the size classes....
- How To Implement Local Notification In Swift
The following steps will guide us on how to develop an application in Swift that implements Local Notification. Requirements are:MacXcode6 - BetaXiOS8StepsOpen xcode.Create a Single View Application, let's name it LocalNotification.Register for user...
- Xcode: Create A Simple Alertview
Open Xcode and create a new Single View Application. For product name, use SimpleAlertView and then fill out the Organization Name and Company Identifier with your customary values. Select iPhone for Devices. Drag a button inside the view controller...
- How To Change Jquery's Dialog Button Label At Run Time
Recently I've used a 3rd party jquery library that pops up a jquery dialog with form content. However if has a default button Save and Cancel, which most of the time is ok, but sometimes you have need to localized or change the label depending on...
Tech-Today
Swift - Displaying Actionsheet for Ipad and Iphone
Swift - Displaying Actionsheet for Ipad and Iphone
A simple tutorial on making an alert view of type action sheet that works for iphone and ipad.2.) Inside the button's action, paste the following lines of code:
let optionMenu = UIAlertController(title: "Choose Your Option", message: nil, preferredStyle: UIAlertControllerStyle.ActionSheet)The code is pretty straight forward:
let option1 = UIAlertAction(title: "Option 1", style: .Default, handler: {
(alert: UIAlertAction!) -> Void in
println("Option 1")
})
let option2 = UIAlertAction(title: "Option ", style: .Default, handler: {
(alert: UIAlertAction!) -> Void in
println("Option 2")
})
let cancelAction = UIAlertAction(title: "Cancel", style: .Cancel, handler: {
(alert: UIAlertAction!) -> Void in
println("Cancelled")
})
optionMenu.addAction(option1)
optionMenu.addAction(option2)
optionMenu.addAction(cancelAction)
if ( UI_USER_INTERFACE_IDIOM() == UIUserInterfaceIdiom.Pad )
{
if let currentPopoverpresentioncontroller = optionMenu.popoverPresentationController{
currentPopoverpresentioncontroller.sourceView = btn_button
currentPopoverpresentioncontroller.sourceRect = btn_button.bounds;
currentPopoverpresentioncontroller.permittedArrowDirections = UIPopoverArrowDirection.Up;
self.presentViewController(optionMenu, animated: true, completion: nil)
}
}else{
self.presentViewController(optionMenu, animated: true, completion: nil)
}
-First we declare a UIAlertController where we can put our buttons.
-Second we created the buttons (Option1, Option2, and Cancel) and then we add the buttons inside the alert controller.
-Last we use the UI_USER_INTERFACE_IDIOM to determine if the device/emulator is an ipad or an iphone and do the necessary presentation for each particular device.
-
Send Email using MFMailComposer (Template)1.) Import MessageUI import MessageUI 2.) Show Email func showMail() { let mailComposeViewController = configuredMailComposeViewController() if MFMailComposeViewController.canSendMail()...
- Simple To-do List Using Core Data In Swift
Note: The steps 1-9 are all simply about setting-up the controllers. The main "core data" begins the next step after. Here's the finish project from step-1 to step-9. 1.) First, for us to have a better view, we have to disable the size classes....
- How To Implement Local Notification In Swift
The following steps will guide us on how to develop an application in Swift that implements Local Notification. Requirements are:MacXcode6 - BetaXiOS8StepsOpen xcode.Create a Single View Application, let's name it LocalNotification.Register for user...
- Xcode: Create A Simple Alertview
Open Xcode and create a new Single View Application. For product name, use SimpleAlertView and then fill out the Organization Name and Company Identifier with your customary values. Select iPhone for Devices. Drag a button inside the view controller...
- How To Change Jquery's Dialog Button Label At Run Time
Recently I've used a 3rd party jquery library that pops up a jquery dialog with form content. However if has a default button Save and Cancel, which most of the time is ok, but sometimes you have need to localized or change the label depending on...