Tech-Today
In this exercise we will be building seam web project in eclipse.
It's long so stay focus :-D.
What you need (The following should be installed correctly):
Note: in parentheses is where I installed mine.
1.) Jboss seam 2.2.1 (C:\jboss-seam-2.2.1)
2.) Jboss AS 5.1.0 (C:\jboss-5.1.0)
3.) eclipse-jee-helios (with jboss tools plugin installed) (C:\eclipse\eclipse-jee-helios)
4.) mysql (C:\mysql51)
5.) mysql jdbc driver (C:\lib\mysql-connector-java-5.1.14-bin)
- How To Install Eclipse Plugin Using Available Sites And Eclipse Marketplace
This tutorial will teach us how to install eclipse plugins such as svn, egit, etc using available sites and eclipse marketplace. Note that I've done this on windows using eclipse-jee-juno. Installing eclipse plugins using available sites: 1.) To install...
- How To Activate Maven Profile Inside Eclipse
Normally maven is use for project dependency management and lifecycle, so there are several developers working on it. Each has its own development environment either in windows, linux or mac. To do this we create several profiles for each developer in...
- Things To Remember In Creating Jbpm With Seam
This writing will reference the TODO example from seam: http://docs.jboss.org/seam/latest/reference/en-US/html/tutorial.html#registration-example Note that I used seam-gen to generate the project. File you should have: +views +login.xhtml +todo.xhtml...
- Jsf Jboss 5.0.1 On Eclipse Helios Tutorial
It took me 2 hours to do this with 1 single mistake, so I'm writing what I did to make it run. Before the actual tutorial here are the errors that we will try to resolve: What I'm using: 1.) eclipse-jee-helios, with jboss tools installed 2.) jboss...
- Open A View In The Eclipse-rcp's Extension Tab Using The Showviewhandler Class
Let's do this quick. 1.) Create a new HelloWorld Plug-in Project and name it CommandParameter. 2.) Open the plugin.xml and click the Extensions tab. 3.) In the All Extensions tab click the Add button and under the Extension Point Filter: search "view"....
Tech-Today
Create a new seam web project in eclipse-helios
In this exercise we will be building seam web project in eclipse.
It's long so stay focus :-D.
What you need (The following should be installed correctly):
Note: in parentheses is where I installed mine.
1.) Jboss seam 2.2.1 (C:\jboss-seam-2.2.1)
2.) Jboss AS 5.1.0 (C:\jboss-5.1.0)
3.) eclipse-jee-helios (with jboss tools plugin installed) (C:\eclipse\eclipse-jee-helios)
4.) mysql (C:\mysql51)
5.) mysql jdbc driver (C:\lib\mysql-connector-java-5.1.14-bin)
Steps:
1.) Creating the database
  1.) Open up your favorite MySql GUI tool, for this exercise I'm using sqlyoq
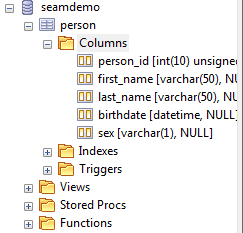
  2.) Create a database seamdemo
  3.) Add a table person, with the following column (you can edit if you want)
  person(id, first_name, last_name, birthdate, sex)
  4.) You can add a record or 2

2.) Create a new seam web project in eclipse-helios
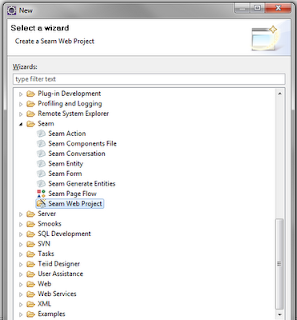
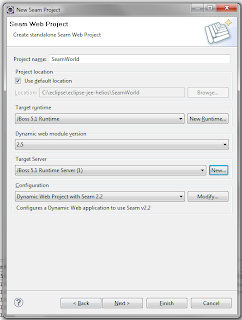
  1.) Select File->New->Other, Select Seam->Seam Web Project

2.) In the Project Name enter SeamWorld
  3.) We need to create a Server Runtime Environment.
    1.) In the Target Runtime panel, select New Runtime
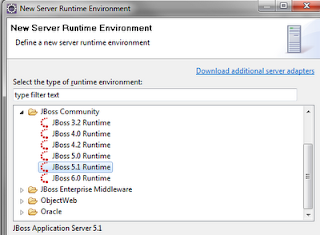
    2.) Select JBoss 5.1 Runtime

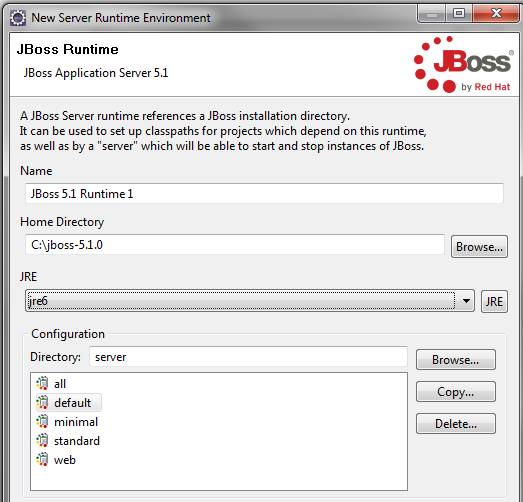
3.) In the JBoss Runtime window
      1.) Point the Home Directory to JBoss Server
      2.) JRE -> jre6
      3.) Configuration -> Default
      4.) Click finished

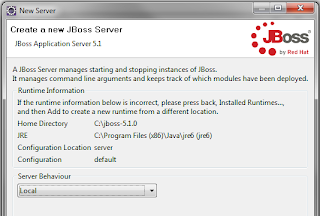
4.) We need to define the Target Server
    1.) In the Target Server panel click New
    2.) Click JBoss AS 5.1, click next
    3.) Select Local in Server Behavior

5.) Select the project you wish to add, then click finish. The final screen should look like:

6.) Click next
  7.) In the Web Module, dont change anything click next
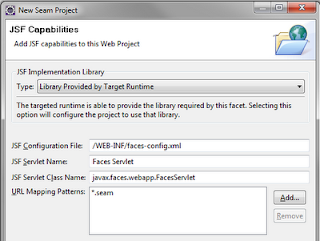
  8.) JSF Capabilities, click next

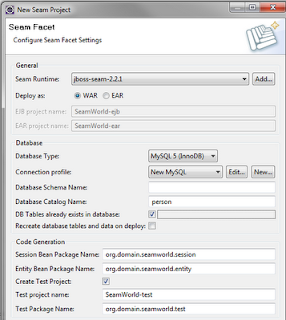
9.) Seam Facet, we need to setup the mysql database connection here
    1.) In the Seam Runtime, select the folder where we installed seam 2.2.1
    2.) Database Type -> Mysql5 (Innodb)
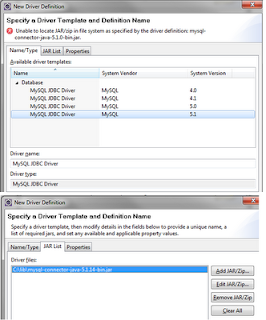
    3.) Click New Connection Profile
      1.) Select MySQL
      2.) Click the + sign in the right side of the Drivers:
      3.) Select MySQL JDBC Driver 5.1
      4.) In the Jar List, select the mysql jdbc driver in the c:\lib
     4.) Click ok

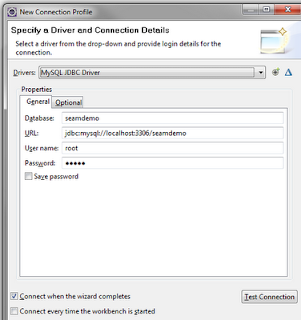
10.) Driver connection should look like this:
    1.) Database: seamdemo
    2.) URL: jdbc:mysql://localhost:3306/seamdemo
    3.) Update the User name and Password
    4.) Click Test Connection to verify that you have successfully setup the connection profile
    5.) Click Finish

11.) In the Seam Facet window
    1.) Database Catalog Name: person
    2.) Check DB Tables already exists in database

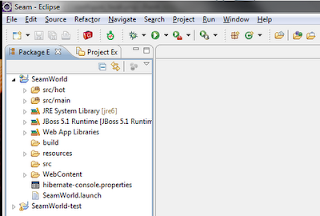
12.) Click Finish. It should look like this.

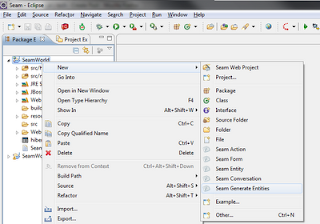
13.) Now we will create the entities
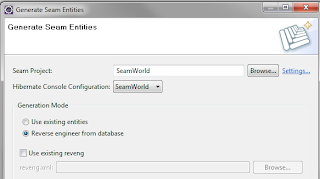
    1.) Right click on the project->New->Seam Generate Entities

14.) Click Reverse Engineer from Database

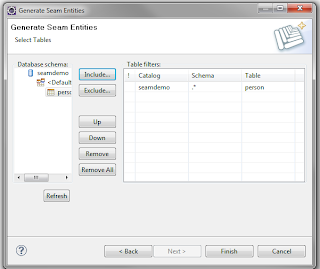
15.) Click next,then Click Refresh. The seamdemo database should appear
    1.) Include person table
    2.) Click Finish

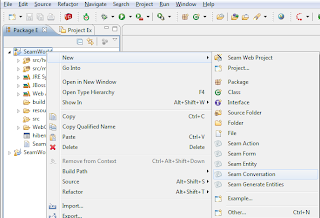
16.) Now we need to create a new Seam Conversation
    1.) Right click on the project->New->Seam Conversation
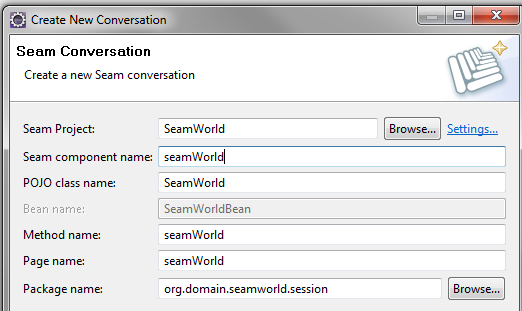
    2.) In the Seam Component Name enter seamWorld
    3.) Click Finish


17.) Right click on project
    1.) Select Run As
    2.) Select the configuration we have just made (JBoss Runtime)
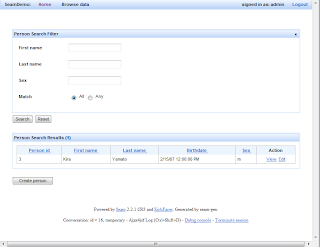
    3.) The screen should look like:

- How To Install Eclipse Plugin Using Available Sites And Eclipse Marketplace
This tutorial will teach us how to install eclipse plugins such as svn, egit, etc using available sites and eclipse marketplace. Note that I've done this on windows using eclipse-jee-juno. Installing eclipse plugins using available sites: 1.) To install...
- How To Activate Maven Profile Inside Eclipse
Normally maven is use for project dependency management and lifecycle, so there are several developers working on it. Each has its own development environment either in windows, linux or mac. To do this we create several profiles for each developer in...
- Things To Remember In Creating Jbpm With Seam
This writing will reference the TODO example from seam: http://docs.jboss.org/seam/latest/reference/en-US/html/tutorial.html#registration-example Note that I used seam-gen to generate the project. File you should have: +views +login.xhtml +todo.xhtml...
- Jsf Jboss 5.0.1 On Eclipse Helios Tutorial
It took me 2 hours to do this with 1 single mistake, so I'm writing what I did to make it run. Before the actual tutorial here are the errors that we will try to resolve: What I'm using: 1.) eclipse-jee-helios, with jboss tools installed 2.) jboss...
- Open A View In The Eclipse-rcp's Extension Tab Using The Showviewhandler Class
Let's do this quick. 1.) Create a new HelloWorld Plug-in Project and name it CommandParameter. 2.) Open the plugin.xml and click the Extensions tab. 3.) In the All Extensions tab click the Add button and under the Extension Point Filter: search "view"....
